
Honestly, I'm still not feeling that great and today has been especially challenging but I am determined to snap out of it! So here I am. Hello, strangers.
Let's talk about that gash durn GARDEN WALL!!! Finally. Well, maybe I shouldn't say "finally" as in finito, put a fork in 'er, she's done. Because... Well, she's not. She's not done, that is. Or is she? Help me decide.
As you know from reading this post, my garden wall obsession started with our honeymoon trip to Spain last year. Maybe someday I'll document that vacation here but for now, what I can tell you, is that Spain is AMAZING!! I fell in love with so many different aspects of that country, but it was the city of Cordoba that served as inspiration for this latest DIY project.
The older part of Cordoba is filled with narrow, winding streets and most of the homes have lovely courtyards filled with vertical gardens showcasing impressive collections of potted plants and pretty flowers. I tell you, I haven't been able to get those beautiful gardens off my mind for months now, so when it came time to spice things up in the dining room...I knew just what I wanted to do!
First though, I mapped out my "idea" and sat with it for a good week. Yes. Little pieces of green tape spotted the dining room wall for at least a week. Maybe even two. I change my mind so frequently with decor (I call it Design ADD) that I've found this works for me. I just sit with my ideas for a second.

Which is what I did here and after an acceptable period of waiting...determined only by God knows what...I decided to go for it! Well, I should say "we" actually, because Biff was a huge help with this one. Gotta give credit where credit is due.
Okay, so after the mapping, came the shopping, painting, drilling and planting.

We decided to go with 4" pots and I painted them black. I used Rustoleum Ultra Cover Premium Latex Paint in Flat Black. And honestly, I just kind of slapped it on there haphazardly. As you can see from this bottom left photo, I cheated a little and didn't even go all the way to the bottom in the inside of the pots. Yes. I'm a slacker like that.
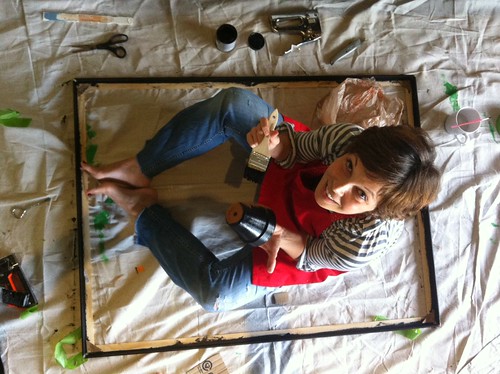
Once the paint was dry, Biff drilled a small hole into each of the pots. Easy peasy. Done in 5 minutes.
Next up, came the planting. Now, here at Camp Cham+Thom we've been known to kill a plant or two, or ten (truthfully). Sooo, we're really just winging it here. I'm going to try my best not to over-water or under-water and just pray these suckers live. And well, if they don't, it's about $4 per plant to replace them. Not that I want to do that or anything, but I'm not going to lose sleep over it.
So we bought lava rocks to help with drainage (btw this huge bag was a WAY better deal than some of the smaller bags). Don't go for the teensy weensy pretty rocks that cost a ridiculous amount of money; no one is going to see them.
After a small scoop of the rocks, we loosened up each plant's roots and replanted them, adding the proper soil (depending on whether it was a fern variety or succulent). That's another thing. How did we choose the plants for the wall? Again, we're just kind of winging it. The dining room does get bright sun but not for very long each day; mostly the light is filtered. Fingers and toes are crossed that our green babies survive!
Once all the plants were potted it was time to start hanging them.

Can we just talk for a second about these "Quick Hangers" we picked up from Orchard Supply Hardware? We had no idea if they'd work; the angle was perfect but we were afraid the "stem" wouldn't be long enough. But Bam! They work perfectly! Well, so far.
I do have to take them down to water them but that isn't too much of a hassle. They go on and off their little "perch" quite easily. I water them in the kitchen, give them some time to drain and then just put them right back up.
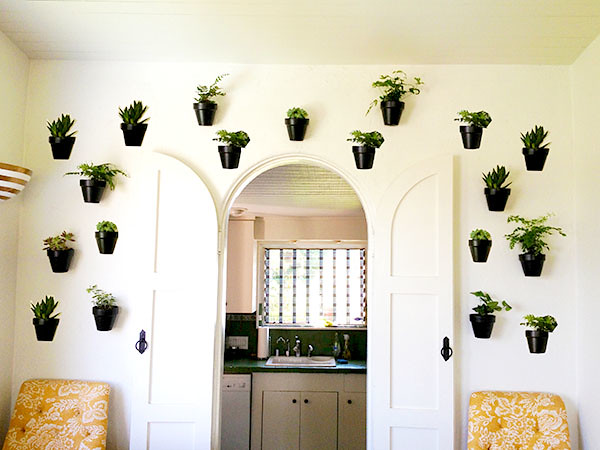
Hello, pretty gold and white striped sconce with your new gorgeous green friends!

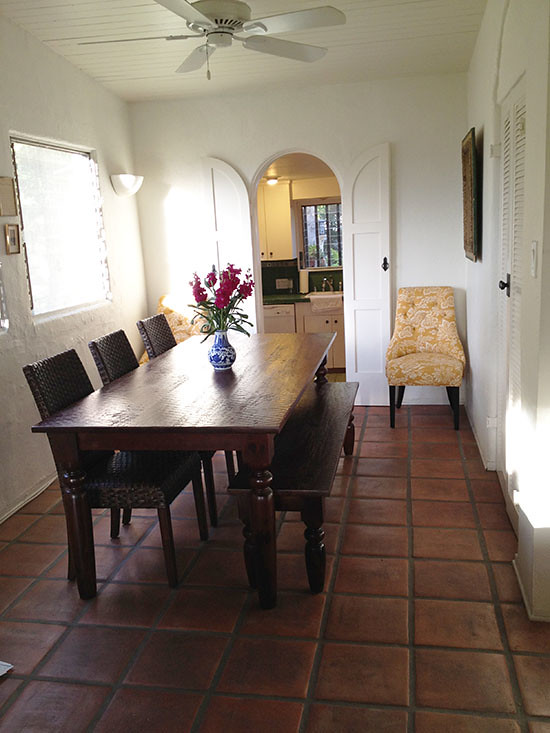
Just a reminder. This is how the dining room looked before.
And here she is now.

Pretty, right??? We think so. Our dining room is totally open onto our main living area and I love glancing over and seeing the greenery on the wall. The only issues are... a.) I'm not loving the "heart" shape that's happening. And b.) Now, I WANT MORE PLANTS!! And with a little help from Photoshop, I'm exploring my options...mapping it out, if you will.
<le sigh>
Alas, perhaps I just need to sit on it for a few days. Because that's what I do.
Well, that's it for me today, party people. Maybe you'll be inspired to get off your bum and make your own garden wall. If you do, I'd love to see!
No comments:
Post a Comment